.
"Food: Science, Art, Passion, Pleasure, Adventure & Exploration"
.
Showing posts with label recipes. Show all posts

Tuesday, March 29, 2011

Savory Explorations 1: Edamame Hummus


First, I have to say that I'm one of those people who goes totally dumbmus over hummus.

It's something I can eat everyday with just about anything - vegetables, breads, meats, soups, salads, even by itself!

So whenever I get a chance to have some really good hummus, as you have to choose wisely as they aren't all made the same, I am always in for a savory treat.

Since I've been on a detox eating plan for the past week, I've been trying out all sorts of recipes and adding them into my culinary book of shadows. One of those random ideas popped into mind while I was munching on some lightly salted and warm edamame for a protein snack. I decided to not only make my own hummus at home for the first time, but to take my love for edamame and make...wait for it...

  
Edamame hummus!  *cue in falling balloons and exploding confetti*


Hummus is traditionally made with chickpeas (or garbanzo) beans. But you can make hummus from some other legumes. Even lentils and red beans! Get as creative as you want with legume substitutions. They each will make for a distinctive-tasting, differently-colored hummus.

Living Tree Community Foods Tahini
Hummus is a Middle Eastern dip that is traditionally made with tahini (a sesame seed paste or butter), pureed chickpeas, garlic, lemon juice, salt, and olive oil. Those are the basic ingredients, but many eateries and culures put their own spin on it by adding in other ingredients or leaving out certain ingredients altogether.

For example, you can make a tahini-based hummus, a roasted garlic-based hummus, a cilantro/parsley-based hummus, a spicy hummus (roasted peppers or lots of cayenne), a yogurt-based hummus or a hummus that uses butter rather than olive oil.  I've had many varieties of hummus and like them all, but I tend to prefer hummus with a good roasted garlic and tahini taste. I also love the flavor of olive oil (premium extra virgin olive oil). Additionally, you can substitute toasted sesame oil for tahini.

Edamame, which is a dish or snack of young soybeans encapsulated in pods (similar to pea pods) are a wonderful replacement for chickpeas in hummus. They are naturally rich and buttery in flavor, a great source of protein, and extremely healthy. You'll often see them served in Japanese restaurants, as an appetizer or entrée, with miso soup before a main course.

I pretty much winged this recipe based on what a traditional tahini has and according to my personal tastes.

Organic, shelled edamame
I purchased some organic, shelled edamame from Whole Foods Market (meaning without pods). These are precooked but they are frozen for freshness. You just need to boil them in water to thaw them.

I made a note of all of the ingredients going into my edamame hummus aside from the obvious (the edamame soybeans):
  • Tahini (between 1/8 - 1/4 cup; it's up to you, taste as you go)
  • Water (loosely 1/4 cup)
  • Lemon juice (1 lemon's worth)
  • Olive oil (3-4 tablespoons)
  • Cumin seeds (1 teaspoon)
  • Green onions (1/4 cup; I really like onions)
  • Cayenne pepper (a dash to sprinkle on top when the hummus is done)
  • Black sesame seeds (sprinkled liberally on top when the hummus is done)
  • Parsley (Italian) (1.5 tablespoons; you can also use cilantro)
  • Garam masala (half teaspoon)
  • Fennel seeds (1 teaspoon; I highly enjoy the flavor of these)
  • Sea salt (to taste)
  • Garlic (2-4 cloves; or to your taste)
Several of the ingredients I used in my hummus
Make sure you have all of your ingredients gathered around for ready-to-go access, and chop up the necessary ingredients.

Start off by pouring in 3 to 3.5 cups of water in a medium pot. Bring the water to a boil.

Drained edamame soybeans
When the water is boiling, add 1.5 cups to 2 cups of the frozen, shelled edamame. Let these boil for about 4-5 minutes, stirring them occasionally until tender and hot but NOT mushy. Taste one to test when 4-5 minutes has passed.

Take them off the stove and drain the water out.

Ready to process
Place the tender but firm edamame soybeans into a food processor along with the tahini, garlic, water, lemon juice, olive oil, cumin seeds, green onions, parsley, garam masala, fennel seeds (you can choose to add them now or later) and sea salt.

Pulse and blend until the mixture is very smooth. You can choose to have a more rustic edamame (textural) if you want, but I prefer it relatively smooth.


Smooth edamame hummus
Taste the hummus once you are done and decide whether or not you want to add more spices or salt...or anything else. It's up to you, really. Explore!

Take some vegetables of your choice (I chose organic baby carrots, celery, and red bell pepper) and cut and slice them up as necessary so that you can dip these into the hummus for a complete snack. I left the baby carrots as is, I deseeded and cut the red bell peppers into strips, and I cut and neatly sectioned the celery into small sticks.

I unplugged my food processor and poured and scraped out my hummus into a bowl and swirled it around to my liking. Then I drizzled in some more extra virgin olive oil into the crevices of the dip and sprinkled in my cayenne pepper, black sesame seeds, and a small pinch more of sea salt.

You can even add sprouted seeds (which I just discovered and am now immensely enjoying). Sprouted sesame seeds are absolutely yummy and go well on top of hummus, among many other things...


This dish made for a hearty lunch, and my adventure in making hummus at home was a successful and enjoyable one. I've since prepared this several more times and have experimented with other herbs and spices. I'd love to try red or black lentils next time!

What is your favorite kind of hummus? And what do you like in your hummus?

Friday, July 30, 2010

Baking Adventure 15: Spiced Double Cherry-Vanilla Pie


Have you ever gone a few days or more with a childhood nursery rhyme or folk song stuck in your head?

Well, I have.

The song was "Billy Boy". It just popped up out of nowhere and made itself a sturdy guest vacationing in my head like my mind was a well-needed motel, spotted by a weary traveler, off the side of a dust-ridden, barren road.

No doubt the earworm was inspired because of the business of baking a cherry pie. I couldn't get the song out of my head if someone paid me a million dollars. That's how insistent it became...and a bit amusing.

Anyway, I indeed baked a cherry pie a few days ago, completely from scratch. The only thing I didn't do was grow the cherries myself, make the butter from cream via ownership of a cow, and so forth. Ha!

The idea originally started with a entry I read on the blog, Chez Pim: The One Pie Dough to Rule Them All

Now, I've made pies in the past, but I always purchased my pie crusts and started from there. I hadn't made a pie crust from scratch until I decided to try the simple recipe listed in that entry. However, as usual, I did put my own spin on the recipe.

How so? Well...

If you've been reading my blog for awhile, you know how I've gone completely mad for the smell, use and taste of brown butter. As a result, I figured I'd employ the use of brown butter in this pie dough recipe. It's commonly said that in order to get a very flaky pie crust, cold butter must be used and kneaded into flour. We know that butter that is browned is heated, so in order to execute my idea of using brown butter, I browned the butter, infused it with a split vanilla bean and its seeds, to give it a very warm, nutty, vanilla aroma and taste, and I chilled the beurre noisette (French term for brown butter meaning "hazelnut butter") in the refrigerator. I left the vanilla bean in the butter, too, so that it could continue to work it's fragrant-setting magic. I made sure that the butter was chilled to become very cold and solid, the way butter is right out of store-bought packaging, otherwise.

When brown butter is chilled, it still keeps that wonderful nutty smell it's known for. I also kept the dark milk solids that separate out in the melted butter, for deeper flavor.

Anyway, here are some pictures of the process and my result (click images for larger view):

^Chunks of cold vanilla bean-infused brown butter (you can see the aromatic dark milk solids mixed in)

^Further mixing in the cold brown butter so that it's evenly dispersed throughout the flour


^Added water and worked the dough further into a large dough clump, which was wrapped and chilled for half an hour, to keep the dough cool to work with

^Dough taken out of the fridge, rolled out and folded onto itself stacked layers. Process repeated several times. This creates "layers" of solid butter pieces within the dough so that the crust comes out very flaky


^Dough was separated into two balls. One for top crust and the other for bottom crust. The second photo shows the bottom crust fitted into the glass pie baking pan. I coated it with eggwash.


The inside of the pie was filled with a spiced cherry filling, which contained two kinds of cherries: Rainier cherries and Bing cherries. The filling also contained sugar, freshly squeezed lemon juice, cornstarch (as a thickener), nutmeg, cinnamon, clove and ginger.
The top crust was placed over the pie and radial-patterned slits were cut into the pie. It was also eggwashed. I sprinkled a generous amount of cane sugar over the top. The granules were coarse, beige, and raw. Just the kind of sugar needed for the top crust. The slits cut into the pie certainly result in oozing of the filling during the baking stage. I had to clean the oven out later because some of the filling dripped onto oven floor. I tell you, that's not very easy to clean out. But, I was so happy with my results that I didn't care. I accepted it as part of the process. Kind of like a rite of passage, if you will. LOL

Finished result. The smell (and taste) of the crust strongly resembled those classic Royal Dansk Butter Cookies in a tin container, especially the pretzel ones that are heavily crusted with sugar. The brown butter idea is a winner for pie crust. It really makes the crust something quite special.


The recipe for the pie filling is also from Chez Pim: Spiced Cherry Pie.  

Again, I strayed by using two kinds of cherries. I was fascianted by the light coloring of the rainier cherries, as well as their sweet and creamy texture and taste, and figured they'd look and be very lovely mixed in with the dark, red hues of the Bing cherries.

I must mention that this pie was gone the next day. It did not last long at all and there were many comments on how outrageously tasty the crust was. I decided to make the pie again, just a day later, and add dark rum in the cherry pie filling. Again, another one of my own takes. I knew that by the taste and smell of the cherry filling, dark rum would be a perfect addition to the flavor profile.

Indeed it was!

The second pie also didn't last long.  The day I baked the cherry pie again and added rum, I also baked a second pie because I had many fresh blueberries (and red currants just purchased from Pavilions) in my fridge and I doubled up the pie crust recipe (again using my take on it with brown butter and vanilla). I baked a blueberry pie (my own version) and will be posting my results in a baking adventure update soon.

^A slice of the spiced double cherry-vanilla pie, but with rum.

Thursday, July 22, 2010

Baking Adventure 14: "Quagmire" Cookies

Quagmire.

Merriam-Webster dictionary defines the word as:

quag·mire
Pronunciation: \ˈkwag-ˌmī(-ə)r, ˈkwäg-\
Function: noun
1 : soft miry land that shakes or yields under the foot
2 : a difficult, precarious, or entrapping position : predicament

The word quagmire sounds intriguing doesn't it? It's always been one of my favorite words. I love the way it sounds, the way it looks, and the way it feels. As someone who is a full-blown synesthete with the condition synesthesia, outside of the word's denotative meaning, I get my own associations and feelings from the word. I get a strong sensation of a custom blend of colors and shapes that the word triggers through its spelling and arrangement of letters. Dark blue-purple or deep indigo is one of the prominent colors or color overlays that the word conjures up for me.

Quagmire also sounds like it could be the perfect name for:
  • an epically intense, mysterious, medieval-fantasy film
  • an introspective, darkly-cerebral music track on a breakthrough album titled the same
  • an addictive and unique adventure-strategy console role playing game with complex quests and compelling characters
  • a high logic board game for serious thinkers with quirky and puckish imaginations
The name is also great for a sweet treat. So, I decided to use the name for a cookie recipe I concocted in the kitchen a couple of days ago because of the look and texture of the cookies, and because of their enslaving  complex flavor.

I haven't started on my mock Twix bar experiment because I've yet to purchase a new supply of quality chocolate to practice tempering with.  In the meantime, I wanted to come up with a tasty cookie recipe using some of my favorite ingredients in the kitchen...and share it here. :)

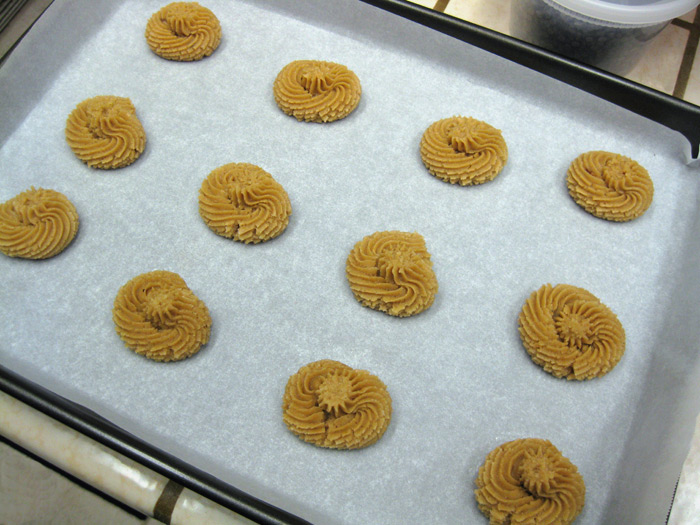
The cookies have a distinctive texture with circular streak patterns on the surface. This is because I piped the cookie dough using a large 2-inch star tip. The photo below shows the first batch of piped cookie dough. Later I manually placed small bittersweet chocolate chips within the swirled recesses to make a spiral pattern. Spiral as a shape, reminds me of addiction, entrapment, and complexity. Also note a modest appearance of the small plastic container of those chocolate chips in the upper right corner of the photo.


When I baked the cookies, they spread out very evenly into generously-sized, peculiar-looking circles with a definitive pattern and characteristic texture. The texture of the cookies is chewy, soft, highly moist (due to the heavy brown butter content), and lush against the tongue with each bite indulgently swooshed around in the mouth. You get layers or swirls of flavor. First you note vanilla-infused brown butter, then almond richness, next brown sugar enrapturement and last, curious, slight hints of bittersweet chocolate as they dissolve with the masticated medley of flavors.

These cookies contain egg yolks, golden brown sugar, flour, almond meal/flour, heavy cream, brown butter (beurre noisette), and vanilla bean essence. Rich, dense and decadent, they certainly are.

Here is my recipe for these cookies. It was an experiment but the results are very successful. I definitely took down notes and placed it in my culinary "book of shadows".

Quagmire Cookies


2 sticks (8 oz.) of butter (browned)
1 vanilla bean
1 and 1/4 cup of brown sugar
3 egg yolks
1/4 cup of heavy cream
2 cups of flour
1/2 cup of almond meal/flour
1 teaspoon of baking soda
1/2 teaspoon of cream of tartar

  1. Brown the butter in a saucepan. Halfway through the process, carefully slice open a vanilla bean and place it into the browning butter to infuse vanilla flavor.
  2. Preheat the oven to 300-350 degrees (ovens vary) and line 2-3 baking pans (depending on size of piped dough) with parchment paper
  3. While leaving in the vanilla bean and also retaining the butter solids, slightly chill the brown butter in the refrigerator in a small bowl, until it is near room temperature.
  4. Cream the vanilla brown butter and brown sugar in a bowl until smooth
  5. Add in the egg yolks and blend well
  6. Stir in the heavy cream
  7. In a separate bowl, mix the dry ingredients together thoroughly: cream of tartar, baking soda, flour, almond flour
  8. Add the dry ingredient mixture into the wet ingredients (yolks, sugar, butter) and stir (manually or with paddle attachment on a stand mixer)
  9. Using a plastic pastry bag and a 1/2 inch - 2-inch star tip, evenly pipe out swirls of cookie dough onto  parchment-lined baking bans
  10. Bake each batch for 8-12 minutes depending on your oven settings or until light golden brown. (Watch cookies carefully)
  11. Use wide spatula to remove cookies from the baking pan onto a cookie rack for cooling.
  12. Cookies should be somewhat delicate but not flimsy when done, but firm up further as they cool, while retaining a chewy, softy, dense texture throughout.
These cookies are sweetened well by brown sugar, but they have a savory appeal, in a sense, due to the deep nutty, brown butter flavor and the almond flour inclusion. Think of just the amount of sweetness that Animal Crackers, well-known childhood cookies, have...or shortbread cookies. These are full-bodied cookies.

Saturday, June 26, 2010

Baking Adventure 11: Seductive Apple-Cinnamon Sticky Buns


These sticky buns are intensely delicious. I guarantee that they won't last long in any household after baking them.

Saddled between their rolled, buttery dough layers is a filling of tender bits of fresh, chopped, tangy-sweet green apple submerged in an addictive and decadent, ginger-enriched, cinnamon-loaded, brown sugar sauce. The buns are topped with an amazing brown sugar glaze made with cream, butter, honey, vanilla bean paste, and moist, molasses-kissed, golden-brown sugar.

Indeed, these buns are rich. In my view, that's the way they are meant to and should be for the best flavor.

I innovated a bit on the recipe listed much further below. For one, as you can see, I used green apple in my filling.

The buns came out just the right texture, coloring, and flavor; in other words, they were a domestic success!

I snapped a few more photos of the buns in a pre-bake, post-bake/pre-glaze, and post-glaze mode. Next time, I will take some photos during the dough prep stages. I really had an interesting but fun time with the process.


When I first made the sticky buns, I realized that my mixer never came with paddle attachments, and I don't have a bread machine at home that I can just casually walk away from, after having dumped all of the dough ingredients in to blend. Lazy luxury, for sure. But somehow, less fun and engaging.

So, I did use my hand mixer to blend in the eggs, salt and buttermilk, once preparing the dough, but I realized that I could not use my hand mixer beater attachments for developing the dough. I figured that before there were any of these gadgets around, historically, dough for sticky buns and rolls were made by hand, so why couldn't I make them that way? I did just that, after adding in the rest of the ingredients for the dough. I watched the clock in my kitchen and began shaping and preparing the dough in my hands thoroughly for a good 5 minutes until it became a very nice texture that looked just about ready for the next stage of prep: rising. Now, looking back, I am glad I resorted to using my hands because my time with the dough was more intimate and appreciative.

I had some concerns about whether or not my dough was going to come out well, however. I thought that if my dough began to rise as it should in the next 2 hours, then that was a sign of being on the right path. My dough surely began puffing up with proud arrogance and I felt a twinge of joy at the sight. Little pleasures like these are always so wonderful and fulfilling, simple as they are.

As the dough size swelled, I busied myself with preparing the filling and the glaze. I had decided earlier on that I'd make an apple-cinnamon filling, although the recipe didn't call for the company of apples. Basically, you can use any filling you want. I had several ideas in mind, especially very unusual ones, but wanted to start with this classic flavor profile, since it was my first time making sticky buns at home, and not in a workshop setting. I also used vanilla bean paste wherever vanilla extract was referenced in the recipe. I find the flavor of vanilla bean paste to be more potent and aromatic because the seeds are still intact. The best choice of all would be to use vanilla bean pods, but I currently do not have a supply of them.
Inside Info: Here's a great resource to order them -- Vanilla Saffron Imports. This site was referred to me by a good friend, and with vanilla being the second most expensive spice in the world, the prices offered are a good deal here.
Once the filling was complete and the dough was rolled out and flattened, I spread the filling generously over the surface of the dough, leaving an inch bare at the top. I carefully rolled the dough into a log and began cutting slices and putting them in the baking pan, which I had some poured glazed into. I had prepared a 12 x 12 x 2 inch square baking pan with parchment paper, leaving flaps of parchment paper on each side, so that I could immediately lift the congregation of buns out of the pan once they were eventually done baking. I didn't bother leaving space between each bun because I like when they are loving, social, and affectionate with one another. In my world, sticky buns should stick together and then be pulled apart.

I also added the rest of the glaze to the tops of the buns, 10 minutes after being out of the oven. This is when they truly came alive and began to bellow out a chorus of sticky, sugary allegiance.

Recipe: Adapted from Gourmandise Desserts

Sticky Buns

Basic Yeast Dough:

3 Eggs
2 tbsps heavy cream
1 tsp salt 
4 cups flour
3/4 cup buttermilk
1/4 cup sugar
1 pouch yeast
6 tbsps (3/4 stick) butter, melted

  1. Place the eggs and salt in the bowl of a stand mixer and whisk until the eggs come together (when the yolks and whites are unified). 
  2. Whisk in buttermilk
  3. Using paddle attachment, add heavy cream, butter, sugar, and yeast and mix with paddle until combined.
  4. Add 2 cups of flour and mix until just combined. 
  5. Add the remaining flour and mix for 5 minutes.
  6. Spread a thin coat of oil in a large bowl and place the dough inside
  7. Wrap the bowl in plastic and place in a warm area. Let the dough double in size, about 2 hours
  8. Coat your rolling surface with a thin coat of flour. Roll out the dough in 18 x 14" rectangle
  9. Spread desired filling on the dough, leaving a little less than an inch up top to seal
  10. Roll up the dough from the bottom to top and seal on top by pinching the seam
  11. Cut rolls in desired thickness with a sharp knife or scissors, and place at least 1" apart in baking pan. (I decided to place the buns close together)
  12. Wrap baking pan in plastic and let rise for another 1.5 hours
  13. Baking at 350 until puffy and golden brown around the edges
  14. Top with desired glaze, 10 minutes after removing buns from the oven

Glaze For Sticky Buns

1.5 sticks of butter
1/2 cup heavy cream
1 tsp vanilla
1/4 cup honey (experiment with honey flavors or use agave nectar)
1 and 1/4 cups brown sugar
1/4 tsp salt (not necessary if you are using salted butter, so I left the salt out)

  1. Place all ingredients in a sauce pot. Cook over medium heat until very warm, but do not boil
  2. Pour 2/3 of the glaze on the bottom of the pan. Reserve the remainder of the glaze to pour over the buns once they are baked.

Filling For Sticky Buns

3/4 cup brown sugar
1 tsp cinnamon
Pinch of salt (again not necessary if using salted butter)
1 tbsps melted butter
1 tsp ginger

  1. Melt the butter. Add the remaining ingredients and mix with a fork
  2. Spread the filling over the dough and roll up as directed


Saturday, June 19, 2010

Baking Adventure 9: Fudgerrific Brownies


^ Two fudge brownies stacked in a glass bowl


^ A batch of fudge brownies on a platter

These brownies are topped with a fudge coating. They're super rich and the chocolate content is high. If you don't like chocolate much or if you are worried about calories and your weight or you react oddly to chocolate like myself (although that seems to never stop me from indulging like a mad woman), then stay away from this recipe!

As mentioned previously, I used the recipe from The Waspy Redheads's blog: LINK

You can try your hand at these hedonistic brownies by following the recipe within her link.

My fudge layer came out a bit differently. The top is a smooth, fudgy, matte finish with a velvety look and texture and my fudge layer is not as thick. I used salted butter for the chocolate ganache layer which gives the flavor a distinctive blend of salty and sweet. Next time, I'd like to have a thicker layer like The Waspy Redhead, so I'll be making a much larger batter in a higher pan so that there's more room for a fatter layer of ganache.

I thought about adding Nutella to the batter mix, but next time I will experiment more with variations in flavor.

Caramel, praline, butterscotch or peanut butter tops would be exquisite . The choices are endless, especially the more exotic and "outside the box" you get with ingredient experimentation.

Some unusual flavors to incorporate into this recipe would be:
  • Blueberry
  • Macadamia nut butter 
  • Maple fudge and candied bits of bacon (if you dare...or care)
  • Blend of sweet spices, cayenne pepper and your choice of a heady liqueur
  • Green tea
  • Mango curd or mousse
  • Sweet potato pie (as a top layer)
  • Gingerbread (perhaps as a custom ganache or as a top, dense bar layer to the brownie)
  • Kumquat ganache or mousseline

Monday, May 17, 2010

Baking Adventure 7: Sweet Shop Colored Candy Meringues

As I mentioned in my previous entry, I had planned to make meringues since I'd never made them before and always enjoyed the curious look of them. I baked a couple of batches yesterday and they turned out quite charming, cracks and all. I also love how the colors and flavors came out.

I actually, just from having made this recipe once, will say that I prefer my meringues to not be completely airy. I will explain how the texture of my meringues came out in a bit. But first, here are some pictures of my meringues.


I made several flavors with corresponding colors:

Pink - Strawberry
Purple - Cotton Candy
Green -Crème de menthe
Cream (off-white) - Vanilla
Orange - Citrus Orange

I planned to add chocolate (light brown) and blueberry (blue) as additional flavors but I've used up all of my Valrhona cocoa powder and I am in need of a trip to Surfas to get more flavoring oils and extracts, which would include blueberry.

Saturday, May 15, 2010

The Wonder of Meringues

I've seen many photos of meringue cookies and I love how many of them look like dollops of icing or stiff swirled cream in various colors.

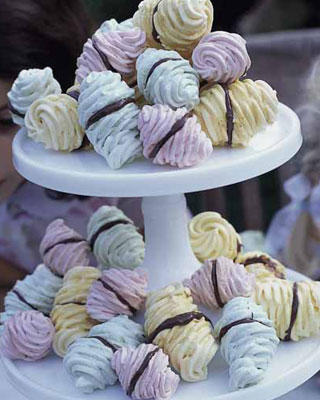
Here are a few photos of meringues that I not only enjoy looking at but that showcase the various ways meringue cookies, biscuits or drops can be made:


Meringue "cookies" don't incorporate flour into the mixture like most cookies do. Meringue cookies or drops, as their name suggests are made primarily from egg whites using other ingredients such as sugar (traditionally white although I have seen brown sugar meringues), cream of tartar, flavor extracts and coloring. Some people add other inclusions such as sugar pearls, chocolate ganache (sometimes sandwiched between two meringue cookies like in two of the photos displayed above), nuts, white chocolate and so forth.

You can be as creative and wild as you want to be with custom meringue recipes. I personally love when they come in a collection of hues from a sweet shop color palette. So fitting.


Thursday, January 21, 2010

Baking Adventure 5: Candied Brown Sugar Melts


I cooked up two big trays of three cheese enchiladas recently. I do have photos (great since it's a savory dish) but I will upload them later in a proper entry dedicated solely to the enchiladas. I think I'll post a recipe too. I haven't done this yet and it's time. Enchiladas are so easy to make and customize.

So, now to my brown sugar melts. Basically, these are rich sugar cookies made with golden brown (light brown) sugar and lots of butter and vanilla, rather than with white granulated sugar. The taste of brown sugar is very distinctive when it cooks within the cookie batter. The entire house smelled like buttery caramel pancakes.

One thing I noticed with this recipe is that I had to turn down the oven temperature a bit because the brown sugar cooks quicker in the dough I made. I also had to raise the oven rack up higher so that the bottom of the cookies would not burn as easily and too quickly. I used a non-stick baking pan and skipped the cooking spray this time around. I found that with my first batter, adding cooking spray at the bottom like I usually do, made the bottom of the cookies slightly burn. I barely had them in there for 8 minutes without noticing a slight borderline burning aroma.